Toggle menu
Toggle personal menu
Not logged in
Your IP address will be publicly visible if you make any edits.

Reflow oven

From North Forge

Tools

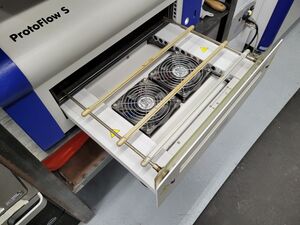
Picture of Reflow oven in the fablab

Model LKPF Protoflow
Room IoT Innovation Lab
Work envelope/max capacity
Link to manual https://archive.org/details/manualzilla-id-5907642/page/2/mode/2up
Related tools
Trainer(s)
Training Sessions no training sessions include this tool
Knowledge keeper(s) Dave Ostapchuk
Training document(s)
Material Safety Data Sheet (MSDS)
Safe Work Procedure
Consumables
Software this machine has no software listed
Equipment type tool
IoT Innovation Lab Precautions apply   

You will be working in the IoT Innovation Lab . In order to keep safe from hazards created by you or other workers using any of the tools in this room, the following precautions apply in addition to any other precautions:

WORK IN PROGRESS

  • Tools and consumables in this room contain toxic chemicals, lead, and are a fire risk.
  • Equipment in this room can carry dangerously high voltage and current.
  • NO EATING OR DRINKING IN THE IoT INNOVATION LAB
  • When working with any liquids or emulsions (including water, flux, cleaning products, solder paste, etc,) ensure you have paper towels nearby to contain and clean up a spill.
  • When working with any hazardous chemicals or substances (eg. solder paste, flux, cleaning products, etchant, etc) you must wear nitrile gloves and eye protection.
  • Keep flammables, such as isopropyl alcohol, away from sources of heat, such as soldering irons, hot air guns, and PCB preheaters

LEAD/CHEMICAL/FIRE RISK

This is used for soldering/reflowing a PCB that has surface-mount components.

The PCB requires an application of solder paste and placement of components before placing in the oven. Solder paste is not provided by North Forge, the recommended type and grade for most applications is no-clean thermally stable T3 (T4+ for smaller components/pin pitch).

Double-sided boards are possible in this unit depending on the mass of the components used, size of pad, and amount of solder paste.

If your board has large SMT components (eg. 1206/0805 or SOIC) you can easily apply solder paste by hand to the pads. For smaller components, using a solder paste stencil with the SD-360U SMT stencil printer will make things much easier.
edit these instructions at Instructions:Reflow oven

The reflow oven is an LPKF ProtoFlow S with a single drawer.

What You Need

  • Tweezers / pliers
  • Safety glasses
  • Heat-resistant gloves (eg. not nitrile)

for all

  • Is there a set in the IOT room? I so, where? If not, tell me to get a set from PA and we can designate them for this machine. Ttenbergen (talk) 12:29, 2024 October 22 (CDT)
  • Cargo


  • Categories
  • Your circuit board
  • Lead-free or leaded solder paste (recommend T3 and higher, no-clean, temperature-stabilized)
  • The heating profile for your solder paste and components. If you don't have this information you can try other profiles but your results may vary.

Before Using the Oven

  • Ensure your solder paste and components are properly applied and there are no loose components.
  • Ensure there is no plastic wrapping or other debris on your circuit board or components.
  • REMOVE ALL BATTERIES FROM THE CIRCUIT BOARD

Oven Preparation

  • Turn on the oven by pressing the grey power button on the front of the unit.
  • Watch the display on the top of the unit. Once the words "SELECT PROFILE SETTINGS" show, it has finished booting. Press the down arrow twice to get to the OPEN/CLOSE menu item, then press the right arrow to select it. The door will open.
  • Put on your heat-resistant gloves.
  • There are three PCB holders that slide on two rails. Slide two of the PCB holders (or all three if you have more than one row of boards to do) so that your PCB is centered over top of one or both of the fans. The PCB should rest on the flat part of the holders, not on top of them.
  • Once you are happy with the placement of the holders, remove your PCB and press the right arrow on the panel to close the door.

Running the Oven

  • Check your PCB one more time for proper component/paste placement and debris.
  • On the oven's control panel, use the up and down arrows to go to the PROFILE menu item and the use the right arrow to select it.
  • Use the up and down arrows to find the appropriate profile. If you do not know the profile, the following are good places to start:
    • Chipquick for leaded paste
    • LF-Medium for lead-free paste
  • Once you've found the profile you want to use, press the right arrow to select it and then press it again to start the profile.
  • The oven will begin heating and should show "WARMUP" on the display.
  • When the oven beeps three times and says "WARMUP DONE", it is warmed up and ready for your circuit board.
  • When you are ready, put on your heat-resistant gloves and press the right arrow. The door will open.
  • Using the gloves, place your circuit board on the holders where you had set it up in the previous section.
  • Press the right arrow on the panel. The door will close and the oven will go through the profile, with a single beep indicating that it's moved to a different part of the profile. A timer will show the time remaining for the part of the profile that it's currently in.
  • Once the reflow is complete, the oven will open automatically, beep five times, and the fans will run to cool down the circuit board.
  • When the cooling is complete, the oven will beep three times. THE BOARD AND OVEN INTERIOR WILL STILL BE VERY HOT. WEAR HEAT-RESISTANT GLOVES AND/OR USE TWEEZERS OR PLIERS TO REMOVE THE BOARD FROM THE OVEN.
  • Place your circuit board on a suitable non-melting surface. The black silicone soldering mats work well for this.

Shutting the Oven Down

  • Check the inside of the oven for any dripped solder, plastic, or scorching

for all

  • if so, are there cleanup instructions or is that also a "broken" thing?
  • Cargo


  • Categories
  • watch the fans to make sure they're spinning. Put a message on the Broken channel in Slack if you have any problems or concerns.
  • Close the oven drawer by pressing the right arrow.
  • Once the door is closed, you may select a profile to run again or turn off the oven by pressing the power button on the front of the unit.

for all

  • Does NF provide solder paste? If so we need details. If not, suggestions where to get it.
  • Any Hazardous waste output from this process?
  • Cargo


  • Categories